Hi, welcome back for another tutorial. It's been quite a while since I put up a tutorial as I've been busy working on toolkits for the Marketplace. One of my earlier tutorials [link: Unit Selection Decals for RTS Games] had focused on how to create ring materials using textures, as well as using them to display unit selection decals for RTS games. However, a drawback associated with using textures was that it prevented the user from changing the inner & outer radius of the ring. And during prototyping stages of a product, it's far better to implement structures that can be changed easily from within the engine so that you don't have to create a new asset from an external package every time you need to test out a new idea. I've found this approach quite useful while working on my own products. Hence, this tutorial focuses on creating a ring material that can be adjusted both from within the material editor as well as dynamically at runtime.
Alright before we get started, I'm going to use the default Top Down Template that comes free with the Unreal Engine, as the top down view is a good example for showcasing the uses of a ring material. We're going to be creating a decal material here. So the first step is to create a new material from the content browser & adjust it's default properties from the detail panel. Under the 'Material' category of the details panel, set 'Material Domain' to 'Deferred Decal' & 'Decal Blend Node' to 'Emissive' as shown in the screenshot below.

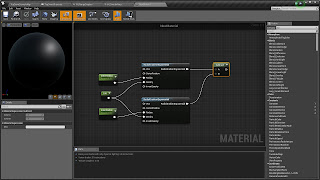
Now right click within the material editor & create two 'RadialGradientExponential' nodes. This node is normally used to produce radial gradients, but we're just going to use them to create two circles. The gradient effect can be negated by increasing the density of both these gradients. For that, just create a new constant expression & set it's value to 100. Connect it to the 'Density' input of both the gradient nodes. Now with that taken care of, we need to specify the outer & inner radius of the ring material. Create two scalar parameters 'OuterRadius' & 'InnerRadius' with the values 0.5 & 0.4 respectively. Connect these two to the 'Radius' input of the gradient nodes. Now subtract the inner radius gradient node from the outer radius gradient node & connect this to the 'Opacity' parameter of the material.
We have thus implemented the core logic for the ring material. Now on to the emissivity & opacity to wrap it up. First, create a vector parameter named 'BaseColor' & a scalar parameter named 'Emissivity' with the default value of 2. Multiple both of them & then multiply it's output with the result of the subtract node we added for the gradients. Connect the result to the 'Emissive' parameter of the material & we have created a circular ring material.

This next step is not necessary, but I created two material instances using this material: one for the unit selection decal & the other for displaying attack range.
Alright, now select the Top Down Character & add two 'Decal' components to it: a Unit Selection Decal & a Range Display Decal. Set the Z value of both to -98 cm & pitch value to -90 degrees. The pitch value is changed because the default orientation of the decal component spawns it in an invisible plane. Since the default dimensions are too small for our needs, we can scale up the Unit Selection & Range Display Decal to (1, 50, 50) & (1, 400, 400). As you may have noticed, we do not scale up the X value. This is because we don't want the decal to be drawn on surrounding objects. Setting it to one allows it to behave in such a way that it gets cut off by the obstacles in it's path instead of painting over them.

Now if you play in the editor, you should be able to see both the unit selection & range display decals display & move along with your character as shown in the screenshot below:

Alright, so that's it for this tutorial. I'll be continuing on with the Unreal Engine diaries series for concepts that do not require a whole tutorial. But I have some ideas for new tutorials as well & if possible, will try to upload them some time during this coming week. Until then, goodbye & have a great weekend. :)

Now right click within the material editor & create two 'RadialGradientExponential' nodes. This node is normally used to produce radial gradients, but we're just going to use them to create two circles. The gradient effect can be negated by increasing the density of both these gradients. For that, just create a new constant expression & set it's value to 100. Connect it to the 'Density' input of both the gradient nodes. Now with that taken care of, we need to specify the outer & inner radius of the ring material. Create two scalar parameters 'OuterRadius' & 'InnerRadius' with the values 0.5 & 0.4 respectively. Connect these two to the 'Radius' input of the gradient nodes. Now subtract the inner radius gradient node from the outer radius gradient node & connect this to the 'Opacity' parameter of the material.

We have thus implemented the core logic for the ring material. Now on to the emissivity & opacity to wrap it up. First, create a vector parameter named 'BaseColor' & a scalar parameter named 'Emissivity' with the default value of 2. Multiple both of them & then multiply it's output with the result of the subtract node we added for the gradients. Connect the result to the 'Emissive' parameter of the material & we have created a circular ring material.

This next step is not necessary, but I created two material instances using this material: one for the unit selection decal & the other for displaying attack range.
Alright, now select the Top Down Character & add two 'Decal' components to it: a Unit Selection Decal & a Range Display Decal. Set the Z value of both to -98 cm & pitch value to -90 degrees. The pitch value is changed because the default orientation of the decal component spawns it in an invisible plane. Since the default dimensions are too small for our needs, we can scale up the Unit Selection & Range Display Decal to (1, 50, 50) & (1, 400, 400). As you may have noticed, we do not scale up the X value. This is because we don't want the decal to be drawn on surrounding objects. Setting it to one allows it to behave in such a way that it gets cut off by the obstacles in it's path instead of painting over them.

Now if you play in the editor, you should be able to see both the unit selection & range display decals display & move along with your character as shown in the screenshot below:

Alright, so that's it for this tutorial. I'll be continuing on with the Unreal Engine diaries series for concepts that do not require a whole tutorial. But I have some ideas for new tutorials as well & if possible, will try to upload them some time during this coming week. Until then, goodbye & have a great weekend. :)
Comments
Post a Comment